You may be new to rock climbing and find that your finger and hand grip is not quite as good as you would like. Hangboarding can help increase that grip strength quickly and effectively, but you may not know when to start using this exercise tool. In this article, we will go over when it is safe to begin using a hangboard, who can use hangboards and some exercises for beginners.
So, when should you start hangboarding? When beginning, it can be tempting to try every exercise immediately as a way to get you past the first climbing levels quickly, but hangboarding should not be attempted until after you have been climbing at least six months. To try and use it before then would be counterproductive as it can lead to severe injuries including sprains, fractures, and torn tendons. It is essential to give your body time to adjust and build up muscles. Children and young adults under sixteen years old should not use hangboarding because it can lead to permanent damage to finger joints and bones.
Page Jumps
- When Should You Start Hangboard Training?
- Should Kids Use a Hangboard?
- Hangboarding Exercises for Beginners
- Should You Hangboard Before or After Climbing
- How Do You Hangboard Properly
- Other Ways to Strengthen Fingers and Grip Safely
When Should You Start Hangboard Training?
Hangboarding is a fantastic method for building up strength and practicing hand forms. Several researchers from the United States Air Force Academy Department of Engineering Mechanics found evidence that hangboards can significantly increase climbing ability. Their results found that of the participants, “92% assessed it as more effective than other training tools, 91% of users [were] able to train harder without fear of injury relative to other training methods, and 86% [reported] improved climbing performance.” You can read the rest of their results here.
Despite it being a great tool, hangboarding should not be attempted immediately. Most climbing experts agree that it is best to wait approximately six months before adding hangboarding into your exercise routine. Using it too soon can injure your fingers because they will get overstressed.
I’ve tried many types of hangboards in my time, but I’ve found the cheaper ones that give the best results and have included them in my recommended hangboards page.

Should Kids Use a Hangboard?
Children and young adults under eighteen years of age should not use hangboards regularly. There are several reasons for this, but primarily it is because their bodies are still growing, and they also have only half of the tendon growth available to adults, so a torn tendon is much more likely. They are also less likely to follow safety guidelines when climbing or recovering from an injury so they can easily damage their finger joints permanently, leaving them with deformed fingers and arthritis pain. Bones are not fully developed until you reach around nineteen years old, so anything you do before then will be incorporated into the growth effect.
One study by the Department of Trauma and Orthopedic Surgery in Germany concluded that it was best for anyone under sixteen not to be allowed to do any regular rock climbing or competition climbing due to frequency of injuries and “this type of permanent damage could adversely affect a climber’s quality of life and future competitive career.” There was also evidence that “climbers aged <16 years should not undertake intensive finger strength training and cannot participate in international bouldering competitions.” You can read the report in its entirety here.
Hangboarding Exercises for Beginners
We have listed below steps for the more common beginner exercises for people who are just starting to use their hangboard. There are also a lot of videos from professional rock climbers and coaches showing proper form for all of these if you are more of a visual learner.
Warm-Up
You need to warm up before starting on the hangboard. Upper body focus is helpful though you will be using your core, so a full-body warm-up is best. Here are a few things to include in any warm-up routine.
- Something to get your heart going like jumping jacks, jump rope, or jogging
- An exercise for loosening up your muscles such as stretching
- Then a few push-ups or easy climbs
- The warmup should last a minimum of 15 minutes
Standard Beginner Exercise
The steps are easy to follow for this beginner dead hang exercise.
- Choose a matching set of handholds on your hangboard then hold onto them using four fingers using an open-handed grip.
- Hang with your weight held by your core, arms slightly bent, shoulders back for approximately 10 or 15 seconds. If you can comfortably grip the ledge for 15 seconds, then you need to move to a smaller hold.
- After each hang, you should dismount by letting yourself down slowly. Wait for one minute and then repeat.
- A set is considered four hangs and four rests. Rest for a full five minutes between each set. Complete four sets for a full workout.
Should You Hangboard Before or After Climbing
Dr. Eva Lopez, a rock climber and coach, has suggested that it is best to hangboard before a climb if you feel the need. If you climb and then try using a hangboard the likelihood of stress injury is higher and also your body will be quite exhausted from the climb you just took so it best to rest your hands, fingers, and forearms rather than jumping immediately into a hangboard routine.
How Do You Hangboard Properly
There are a few things you need to do to make sure that your hangboarding is done correctly.
How High to Set Up the Hangboard
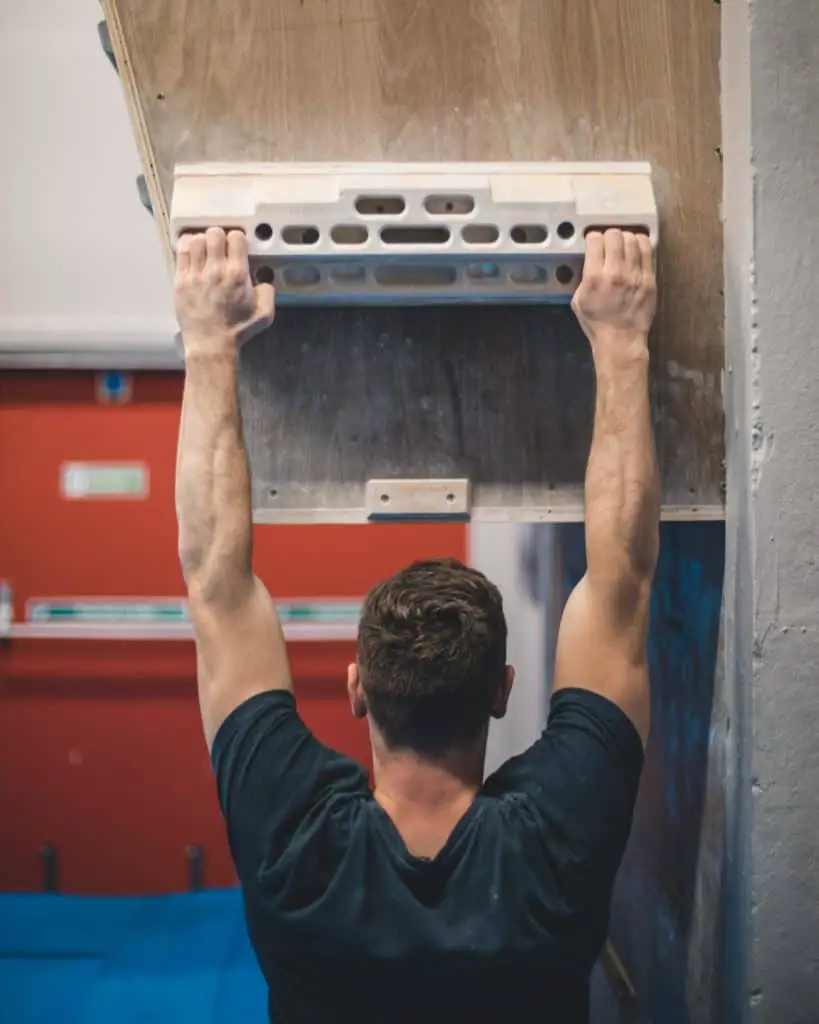
When you situate your hangboard in your workout area, it is essential to make sure that it is not too high. You will be dead hanging off it, so you want enough room for you to do that while still being able to dismount correctly. During your dead hang, your knees will be slightly bent, so when you straighten them, it should be easy to lower yourself to the floor. If you need to drop from the board in order to reach the floor then it is too high, and that drop can injure your finger tendons.
Proper Hangboard Form
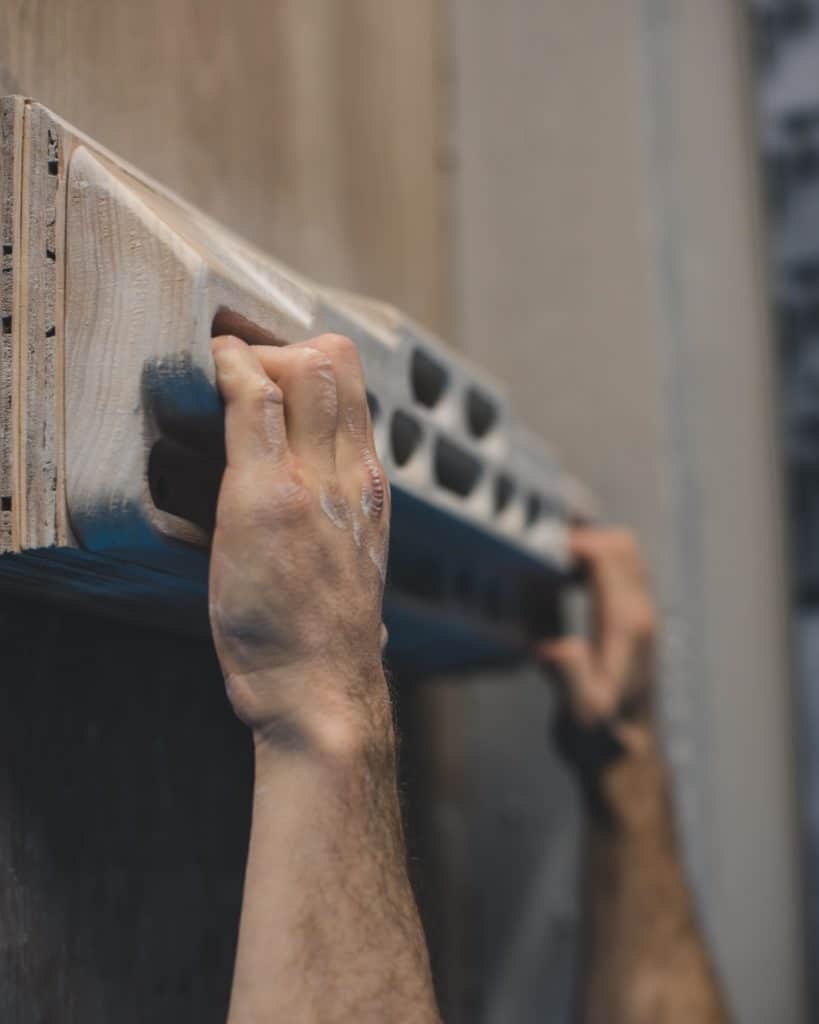
To get the most out of your workouts and avoid injury, it is important to use proper form. You should use an open-handed grip instead of curling your hand into a crimped position. Crimped grips overstress your finger pulley system and tendons, which can often lead to tears and breaks. Your knees should be slightly bent, and your core should do most of the work. Your elbows should also be bent with your shoulder blades pulled back and down but not to an extreme degree. You do not want your chest to be thrust forward by the action.
Additional Points
Make sure you warm up before starting and that you stop if you feel any pain in your hand or fingers.
Other Ways to Strengthen Fingers and Grip Safely
Hangboards are one of the most effective ways to gain grip strength and finger dexterity for climbing, but they are far from the only option. If you are a young adult and want to work on healthily increasing your grip strength or if you simply do want several workout options to choose from, then there are several. Below we have listed some alternatives and how they work.
Circuit Board at a Climbing Gym
This is a relatively short, slanted wall or board with evenly spaced out handholds for you to use for grip strength training. Most gyms and indoor climbing centers have one of these available for use. These boards are most useful in training both sides of your body equally because the handholds are mirrored on both sides of the board, so that muscle groups on either side of your body get the same degree of workout.
Gyroball
There are quite a few different models to choose from with these isometric resistance balls that allow you to exercise your grip strength by working against the fingers, palm, forearm, and wrists. It is excellent for flexor muscles. Check them out on Amazon here.

Forearm Flexors With Dumbbell or Improvised Weight
Here are a few exercises you can do with either dumbbells or a can of food. It is best to start around 5 pounds and then work your way up as you get accustomed and gain strength. We also have some additional exercises that can be helpful in our article here.
Palms Up Wrist Curl
- Starting position is sitting with your arms laid out straight along your legs and wrists on your knees, palms up.
- With a weight in both hands, you will want to lift them both at the wrist as high as you can without moving the arm.
- Pause for a beat.
- Lower the weight back to starting position.
- Repeat.
Palms Down Wrist Curl
- Adopt the same starting position as the last exercise, except your palms, should be facing down.
- With weights in both hands, lift them as far as you can without moving your arm.
- Pause for a beat.
- Lower back to starting position.
- Repeat.
Grip Crush
- This exercise should be done one hand at a time.
- Starting position is sitting with your arm laid out straight over your leg, wrist at the knee with your weight in hand.
- Slowly relax your hand, which will allow the weight to roll down towards your fingertips.
- Tighten your grip around the weight and lift your wrist as high as possible.
- Return to starting position.
- Repeat.