Crash pads are pretty much an essential item when outdoor bouldering unless you’re a free solo expert. When choosing crash pads there are many attributes to take into account. You need to think about whether the crash pad is good for high and shorts falls. Stiff foam is good for high falls, however it’s very uncomfortable for short falls. The durability of the foam is another thing to take note of – you don’t want to spend a lot of money on something for it to break down in no time. The same goes for the material used on the outside of the crash pad, this needs to be durable as well. When bouldering outside you’ll probably be travelling from rock to rock and a fair bit of walking may be involved, so you need to think about how heavy the crash pad is and how easy/comfortable it is to carry. Then there are the cool accessories that some crash pads come with which can set them apart from other pads. And last but not least, everyone wants value for their money. I’ve tested many crash pads in my time with different climbers and eventually got a feel of which crash pads are my favorites.
My Top Picks
If You’re Not on a Budget
Metolius Recon Crash Pad
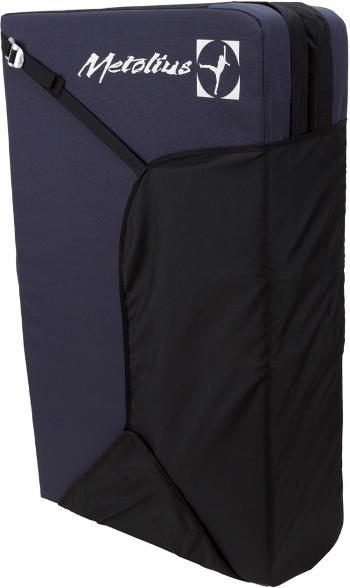
If you’re willing to spend a bit more for the best crash pad while still getting value for money then I’d go for the Metolius Recon Crash Pad. It comes with 3 panels that have angled hinges for easy transportation to the crag. Angled hinges also eliminate gutters found on most folding crash pads. The pad is large enough to be used on its own but also couples up well with another pad for more surface area.
This crash pad has 3 layers (compared to the 2 layers you get on most crash pads) for extra impact absorption. It’s suitable for higher bouldering problems, however I always advise stacking pads over 4 meters.
The fabric on the bottom of the crash pad is 900-denier strong (in fabric terms that’s very strong). This makes it very durable for regular outdoor use. Additionally, the logo is carpeted so you can wipe your shoes on it to keep them clean which is a cool accessory.
There’s a small exterior stash pocket for valuables, and there’s a large interior pocket where you can stash your climbing shoes, chalk brushes, chalk etc. when the crash pad isn’t in use. The crash pad is quite easy to carry as the shoulder straps are nicely padded. It comes with a couple of strong handles on the side which you can use to easily drag the pad underneath a climber while they’re bouldering. There’s also a lifetime guarantee on the aluminum buckles attached.
If You’re On a Budget
Metolius Session II Crash Pad
In terms of value for money, my favorite crash pad is the Metolius Session II Crash Pad. For a crash pad it’s pretty cheap. As long as you’re not climbing overly high bouldering problems (3.5 meters max) this crash pad should be fine. Anything over that height and I’d advise you to stack your pads. When I saw the price tag I was pretty impressed with the foam density of the 2 layers, plus I have nothing to complain about the durability of both the foam and the exterior fabric.
This crash pad has been redesigned since it was originally released. They’ve added 2 drag handles similar to the Metolius Recon Crash Pad which make it easier to position the pad when it’s unfolded. Plus the flap closure system has also had a redesign, making the pad easier to load. When bouldering the pad reverses so that your shoulder straps are covered up while climbing meaning you won’t fall on them.
In terms of cool accessories, just like the Recon Crash Pad, the logo is carpeted so you can wipe your shoes on it to keep them clean. The shoulder straps are also nicely padded which means it’s very comfortable to carry around. It also includes a waist belt. For the price, you can’t really go wrong.
The Science Behind Bouldering Crash Pads
Crash pads are made using engineering and science. There are usually two layers of foam inside a crash pad – a thicker, low density layer of foam on the bottom and a thinner, high density layer of foam on the top. This spreads the load which makes it safer for you to land on. You should only land on one side of the crash pad for safety and to keep your shoes clean. Usually the manufacturer will put their logo on the top of the crash pad.
Crash pads usually have straps systems for ease of carrying, which can be attached either on the bottom or top of the crash pad depending on the manufacturer’s choice. If they’re on the top of the crash pad they can usually be removed so they won’t cause a hazard.
How to Arrange Bouldering Crash Pads
When arranging crash pads under a climber make sure the “platform” of the crash pads is level. The ground can be anything BUT level when bouldering, so use your creativity to create a base under the pad. For example use another crash pad underneath (maybe folding it to level the floor). There should be no gaps if possible in between multiple crash pads to stop ankle twists and body parts hitting the ground.
Arranging bouldering crash pads depends on the type of climb you’re doing. For example with a traverse you may want to think about the surface area of your crash pads, arranging them at the hardest part of the problem. If you’re climbing a higher bouldering problem you may want to stack two pads on top of each other for extra padding.